9 chapters to master LinkedIn Sales Navigator in < 90 min
Bonus: 3 LinkedIn Referral Playbooks
Hey - it’s Alex, this time together with Arnaud Renoux!
Today, we cover:
1️⃣ How to build ICP lists with LinkedIn Sales Navigator
2️⃣ Monitor sales triggers to engage at the right time
3️⃣ Getting warm intros with 3 Referral Playbooks using LinkedIn
Bonus: List of my vetted Go-to software tools for early-stage SaaS startups
In case you missed the last 3 episodes:
✅ How to analyze your early customers to find your ICP
✅ The Ultimate Founder-Led LinkedIn Guide
A quick word from our sponsors
📢 Semrush—Boost Your Online Visibility with award-winning SEO Tool
Rank Higher with Better SEO. Fix site issues, create content that converts, and find profitable new keywords to target with our SEO toolkit. Get more traffic to your site and beat the competition.
📢 Attio—AI-native CRM that’s built for the future
Attio is the CRM for the AI era. Connect your email, and Attio instantly builds your CRM - with every company, every contact, and every interaction you’ve ever had, enriched and organized.
You can also build AI-powered automations and use its research agent to tackle some of your most complex business processes, freeing you to focus on what matters the most: building your company.
Join industry leaders like Flatfile, Replicate, Modal and more.
This post contains affiliate links, and I may receive commissions if you sign up for tools with my affiliate links—at no extra cost to you. I only recommend tools I trust and use myself.
1️⃣ If you’re new to the newsletter: I share bi-weekly actionable SaaS GTM strategies and tactics that will help you grow your B2B SaaS business from €0 to €1 million ARR 🚀
2️⃣ If you enjoyed this post, share it with a friend to get my 100+ actionable SaaS growth tactics for free 🥁
3️⃣ Work 1-on-1 with me - GTM Advisory for early-stage SaaS founders on their way to €1 million ARR (1 free spot - limited to 8 founders).
👇This guide might be too long for your email inbox. So read the full guide here 👇
Get a shoutout to over 55k+ people
✉️ Hit reply and share your best LinkedIn (Sales Navigator) tactic with us.
Arnaud and I will share the best ones on our LinkedIn.
Why you should use Sales Navigator
Before we dive into LinkedIn Sales Navigator, let’s talk about why you should use it.
LinkedIn is the biggest B2B database in the world. Over 1 billion contacts and millions of companies are on the platform.
The chance that your ICP is on the platform is quite high.
This makes it a goldmine for sales and social selling.
On a high level, LinkedIn Sales Navigator allows you to:
1️⃣ Find your (ideal) potential customers
2️⃣ Get their contact information
3️⃣ Track signals & engage on LinkedIn with them
It’s like having a magnet to attract the right leads—if you know how to use it.
This guide breaks it down into 9 chapters. Step by step, you’ll learn what matters, not just what to click.
By the end, you’ll know how to find and connect with decision-makers who need what you offer.
Throughout this guide Arnaud and I share a lot of screenshots of our LinkedIn Sales navigator - so you will see how we both target different people.
What you can do with LinkedIn Sales Navigator
LinkedIn Sales Navigator is the biggest B2B database and a goldmine for sales.
Here’s a quick, high-level overview of what you can do with it:
Search for people based on 30+ filters
Search for specific companies based on 15+ filters
Save searches and get new leads on autopilot (that match these filters)
Add people & companies to a custom list (to keep track of them)
Track signal/ Monitor their engagement/activity (to know when to reach out)
Get warm intros via your network
Export leads for sales activity
LinkedIn Sales Navigator allows you to search for these 2 ‘data objects’:
1️⃣ Persons/Contacts (aka. Leads)
2️⃣ Companies (aka. Accounts)
You can also combine both, e.g. search for people within the companies you filtered.
We have structured the guide such that -
Chapter 1 to Chapter 4 will focus on individuals - while Chapter 5 to Chapter 7 on accounts.
In the upcoming 9 chapters, we will show you how you can do lead searches and also account searches (and of course, how to mix both to get the most out of it).
Let’s dive into it.
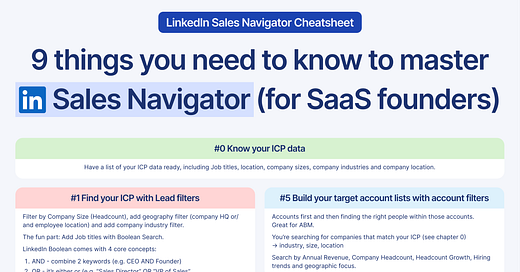
9 things you need to know to master LinkedIn Sales Navigator
Chapter 0: Your ICP (Persona + Company) Criteria
To find the right people using Sales Navigator, you must have your (first version / best guess) ICP ready. This includes:
✅ Job Titles
→ e.g. a list with “Head of Sales”, “Director of Sales”, “VP of Sales” or “Co-Founder”, “Founder”
✅ Company Industry
→ e.g. a list with “Software Development” and “Technology, Information and Internet”
✅ Company Size
→ e.g. from 10-50 employees
✅ Location (Company and/or person)
→ e.g. “Germany”, “Austria” and “Switzerland”
and other criteria that might be relevant to you.
💡Don’t have your ICP? Use our ICP framework template.
Chapter 1: Lead Filters
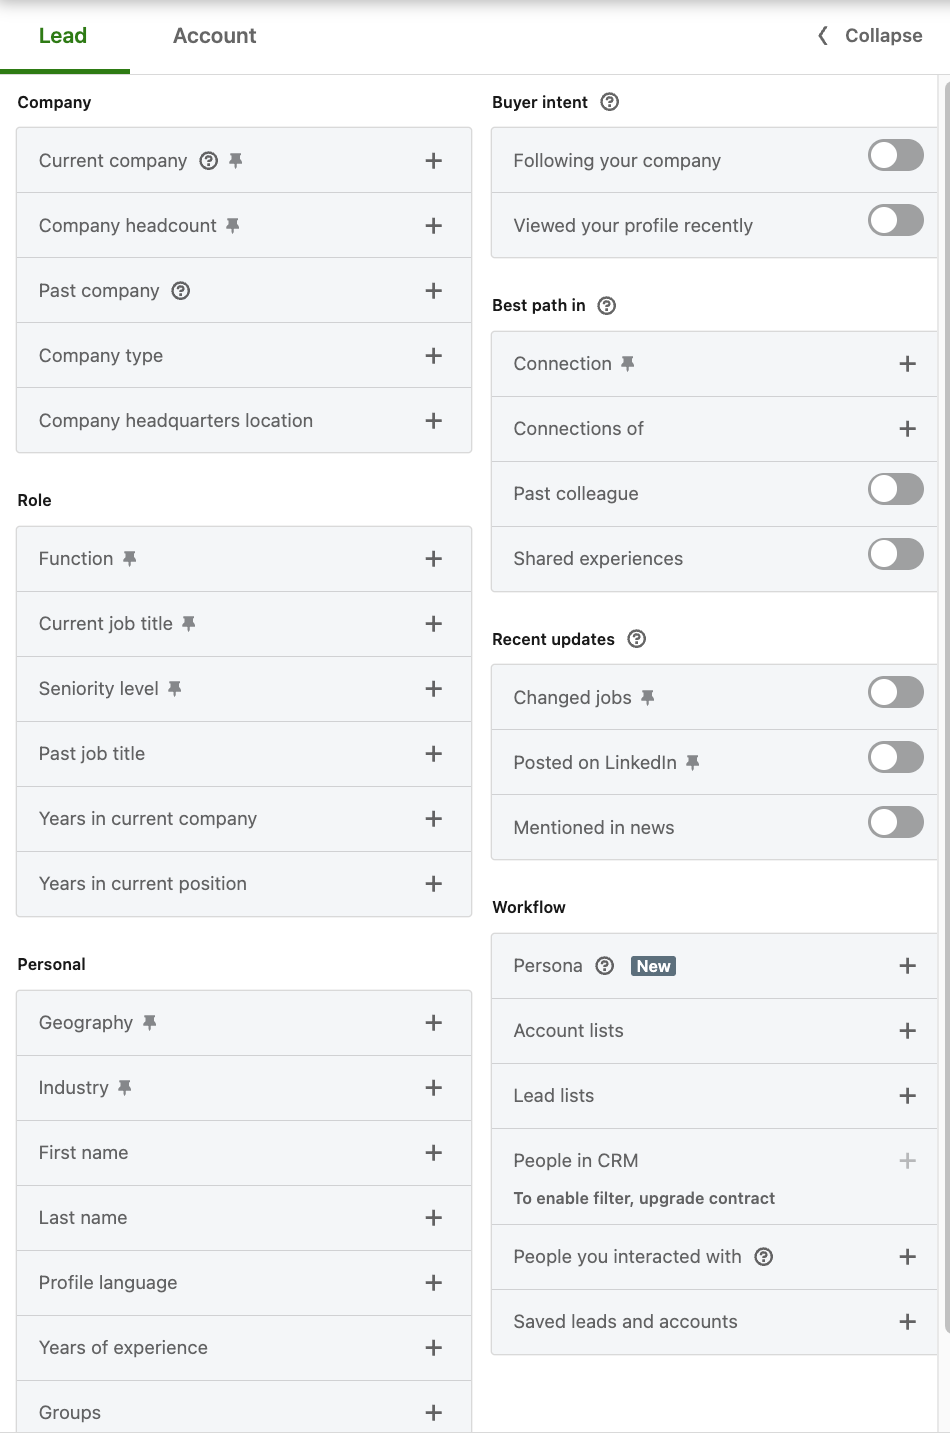
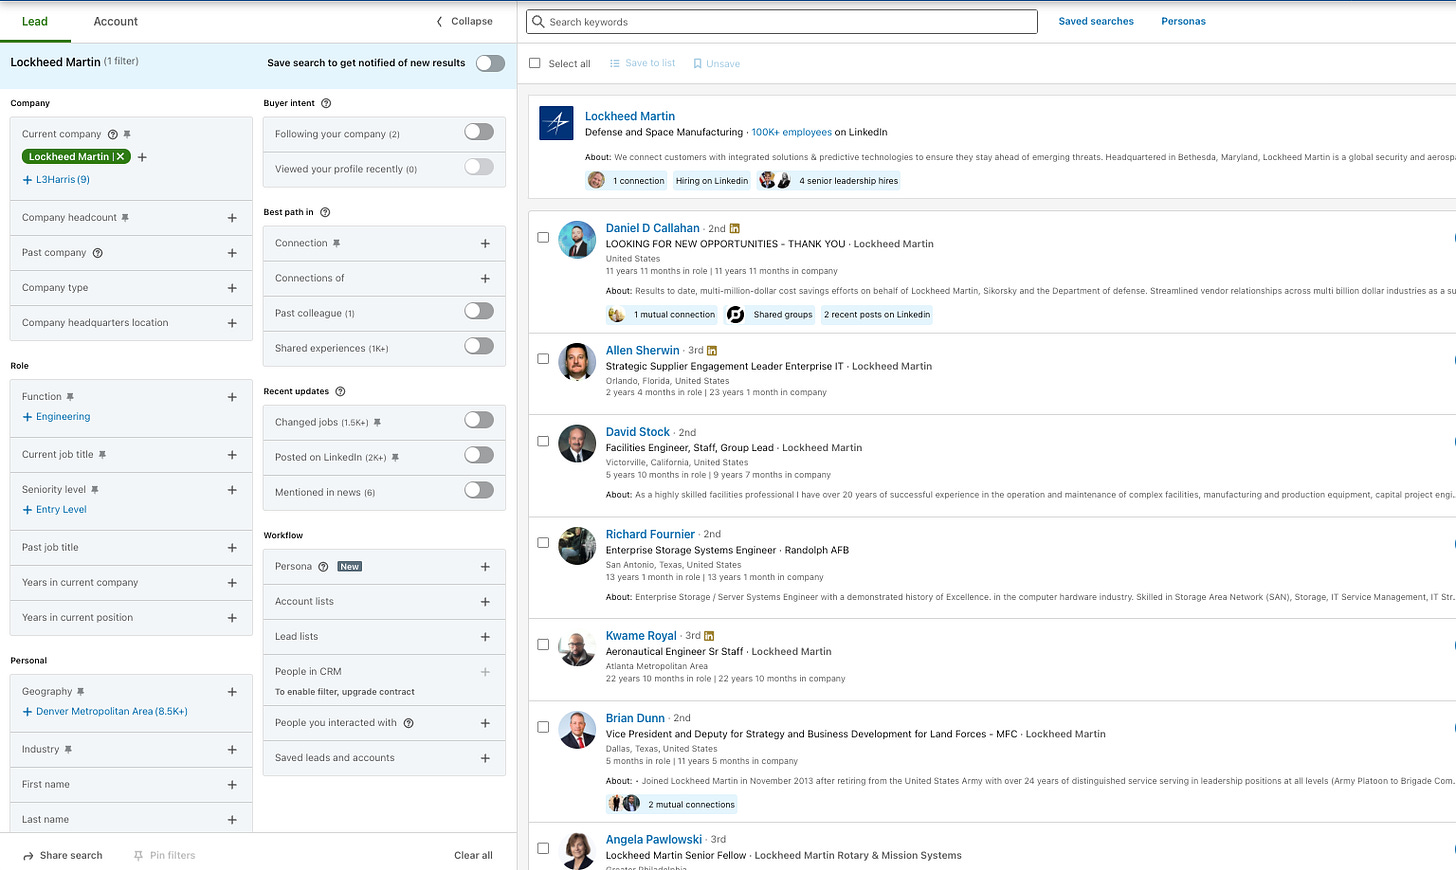
Building your first lead search on Sales Navigator? The filters might feel overwhelming.
Think of them like describing your ideal customer to a friend.
The more details you give, the better LinkedIn can find the right people for you.
Filter 1: Company Size
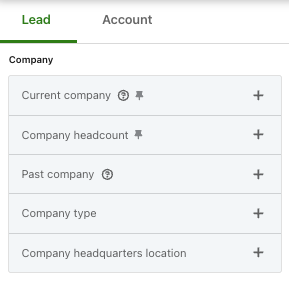
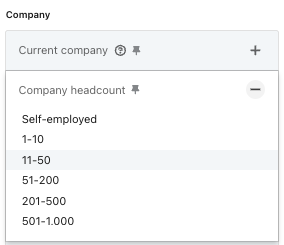
One of the first filters you’ll see is Company Headcount—and for a good reason.
Purpose - A company’s size tells you:
How much budget they might have
How complex their needs are
Who makes buying decisions
What challenges they might face
How to Use It:
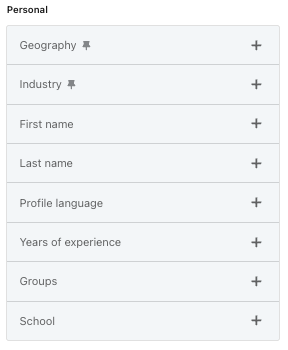
Find Company Headcount at the top of your filters
Click it to see the options
Choose from Self-Employed to 10,000+ employees
Sales Navigator will show you how many companies fit each size (once your other filters are applied)
Filter 2: Location
Purpose - Finding the right companies in the right places.
You have the right size of companies; now, let’s narrow them down with location using the geography filter below company size.
There are 2 ways to target companies:
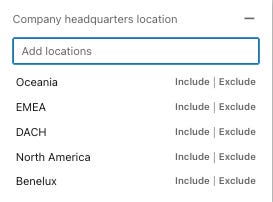
1. Company HQ Location
Especially important if you target companies based in specific regions. Excluding specific regions you don’t want to target is a good idea for most startups.
The Company HQ info tells you where the budget is controlled and decisions happen.
2. Employee Location
It tells you where the person is located. This might be different from the HQ location (especially with remote work).
In a lead search, employee location is highly recommended.
How to Use it:
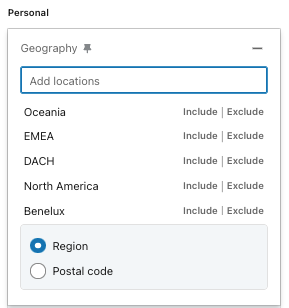
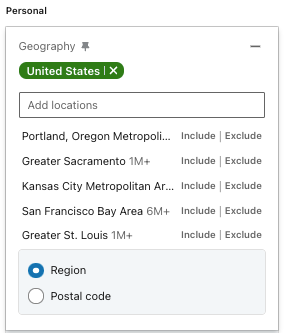
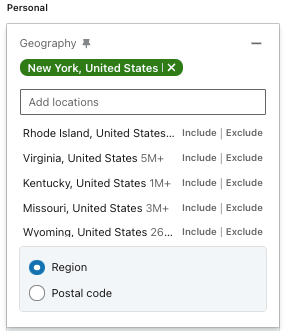
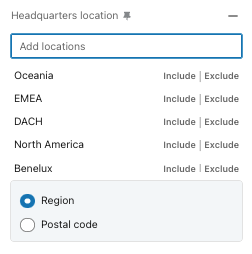
Click Geography
Type your main market (e.g., United States)
You can also add key business hubs (New York, SF Bay Area, Chicago, etc.)
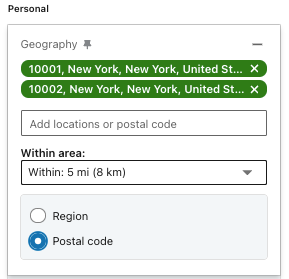
💡 Pro Tip: If you want to narrow your location to a specific town or neighborhood in a city, use the postal code.
Let’s say you want to target one or multiple areas in Manhattan in New York City.
Apply one or multiple into your Geography filter
PS: Keep in mind that some great prospects might work remotely in another city.
Filter 3: Industry
Purpose - Finding companies that need you
Filtering by Industry helps you focus on companies that need your product/service instead of wasting time on bad-fit leads.
Based on your ICP, industry can be a hard ICP criterion (e.g. vertical SaaS for specific industry) or if you target multiple industries, it might make sense to build a different list for each industry. That way, you can build highly relevant messages.
Different industries have different Needs, Pain Points, Budgets, and Decision-making speeds.
Knowing what industry(ies) need your product/service will help to:
Target real pain points
Avoid budget mismatches
Adapt to buying behaviors
Increase response rates
How to use it:
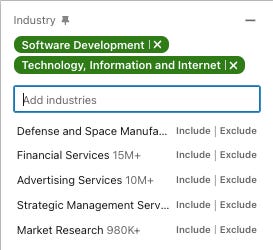
Find the industry filter
Select 2-3 industries that match your best customers
For the example, we selected 2 industries:
- Software Development
- Technology, Information and Internet
💡Pro Tip: To improve the quality of your lead search, I suggest avoiding selecting too many industries—stay focused. Better to build different searches per industry (in case you target different ones).
Take into consideration that each industry has its own particularities:
Tech Startups: Fast-moving, budget-conscious, open to new tools
Finance & Banking: High budgets, slow decisions, trust is key
Healthcare: Compliance-heavy, risk-averse, needs proven solutions
E-commerce & Retail: ROI-driven, willing to test new tech
Manufacturing: Traditional, cost-focused, slow to adopt new tech
Filter 4: Job Title
Purpose - Find the people who make buying decisions.
Not everyone in a company has the power to say yes, but many can say no—which is why targeting both decision-makers and influencers is key.
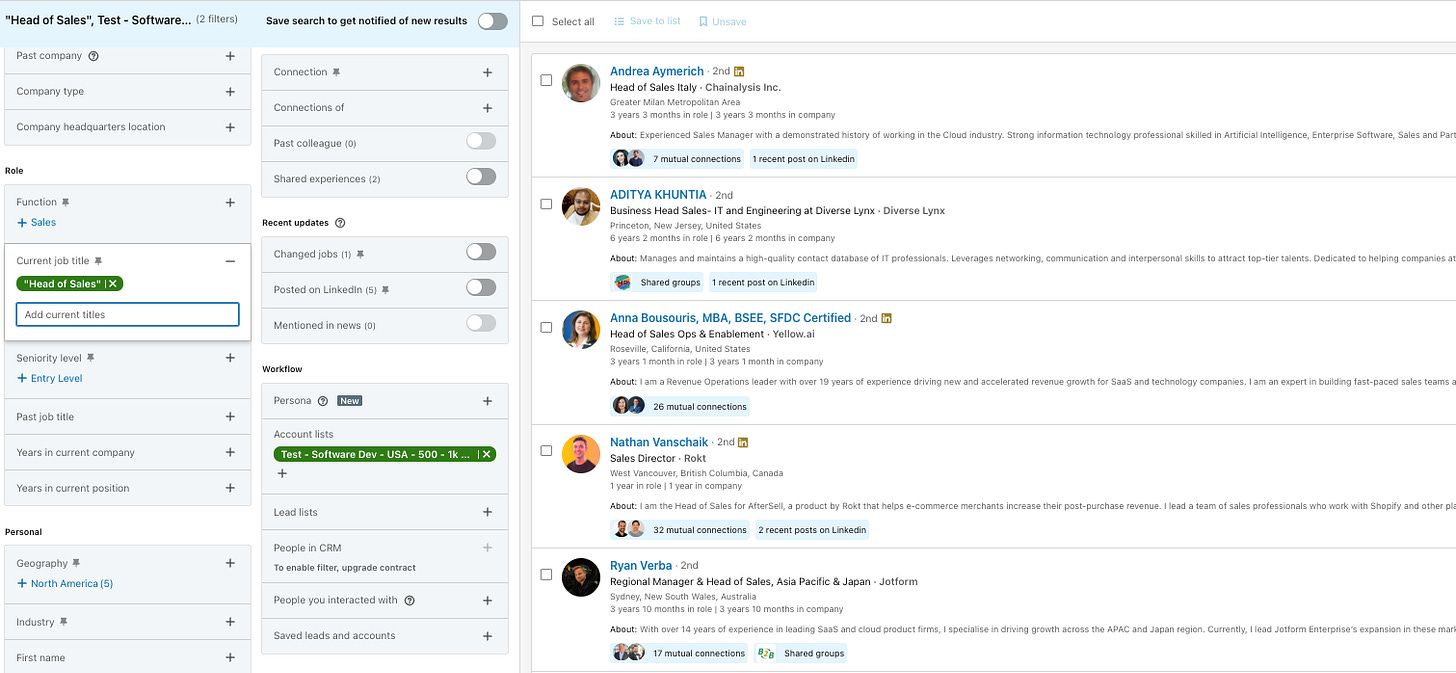
Use the “Current job title” filter and enter job titles that match decision-makers and influencers.
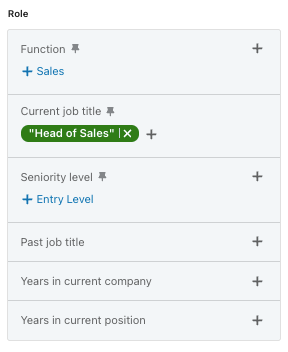
You have 2 options to write the “Current job title” you’re targeting.
Option 1- Using Boolean (“Head of Sales”)
Using Boolean in LinkedIn Sales Navigator helps you refine results with precise keyword combinations, allowing you to target the right prospects more accurately.
LinkedIn Boolean comes with 4 core concepts:
AND - combine 2 keywords (e.g. CEO AND Founder)
OR - it’s either or (e.g. “Sales Director” OR “VP of Sales”
NOT - to exclude terms (e.g. NOT Assistant)
Quotes “ “ - search for exact term (e.g. “Purchasing Manager”)
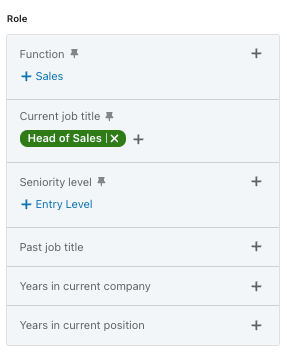
Option 2- Not using Boolean (Head of Sales)
What’s the difference? Option 2 will provide significantly more results than Option 1.
However, the Boolean search on Head of Sales will be a lot more targeted (meaning fewer irrelevant prospects).
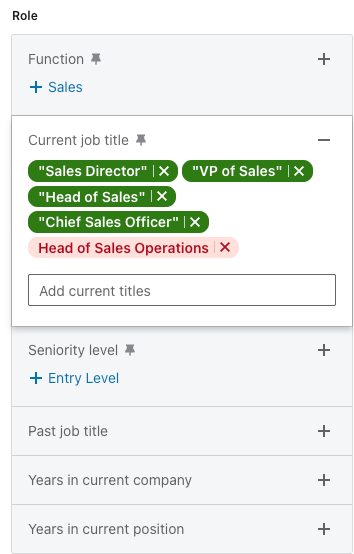
We recommend using Boolean search to get only contacts that match exactly these roles.
(You can also exclude specific roles).
Here’s an example of how this might look if you target Sales Leaders.
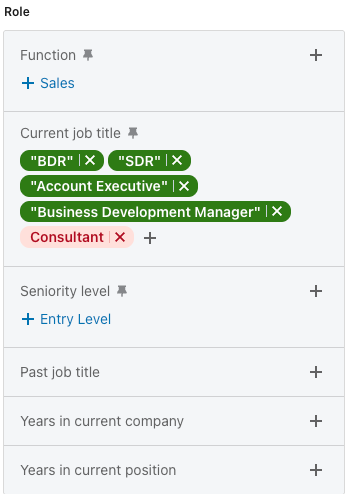
And if you also want to target Influencers (they research and recommend tools) or even the users (to go bottom up), that might look the following.
💡Pro Tip: If you're unsure who makes the final call, start with influencers. They often introduce vendors to decision-makers.
P.S. Keep in mind that you can also use the search bar of Boolean Searches, but the search bar scans multiple fields (including job title, summary, and profile text), so results may include profiles where the job title appears in other sections.
Filter 5: ‘ready to buy’ decision makers
Purpose - Targeting people based on “signals”
By now, we’ve filtered contacts by::
Industry,
Company Size,
Title,
Location,
That’s great, but you still might end up with a list of 1000+ contacts.
The good thing is that LinkedIn has some great filters built in that help you identify ‘ready to buy’ people (or at least a signal that they have a higher probability of being a good fit).
This includes:
✅ Following your company
✅ Viewed your profile recently
✅ Changed job
While the first 2 are great buying intent signals, chances are high these are just a few (but go for them!).
Let's refine your list even more.
Targeting newly hired decision-makers is a smart move.
They:
✅ Have fresh budgets
✅ Want to make an impact
✅ Are open to new solutions
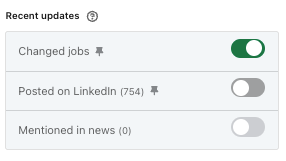
“Changed jobs” filter
This shows people hired in the last 90 days—prime candidates for outreach.
Why does this work?
New hires are evaluating:
Current tools—what stays, what goes
New goals—fresh strategies and priorities
Vendors—open to better solutions
💡Pro Tip: If a company is hiring, they likely have a budget.
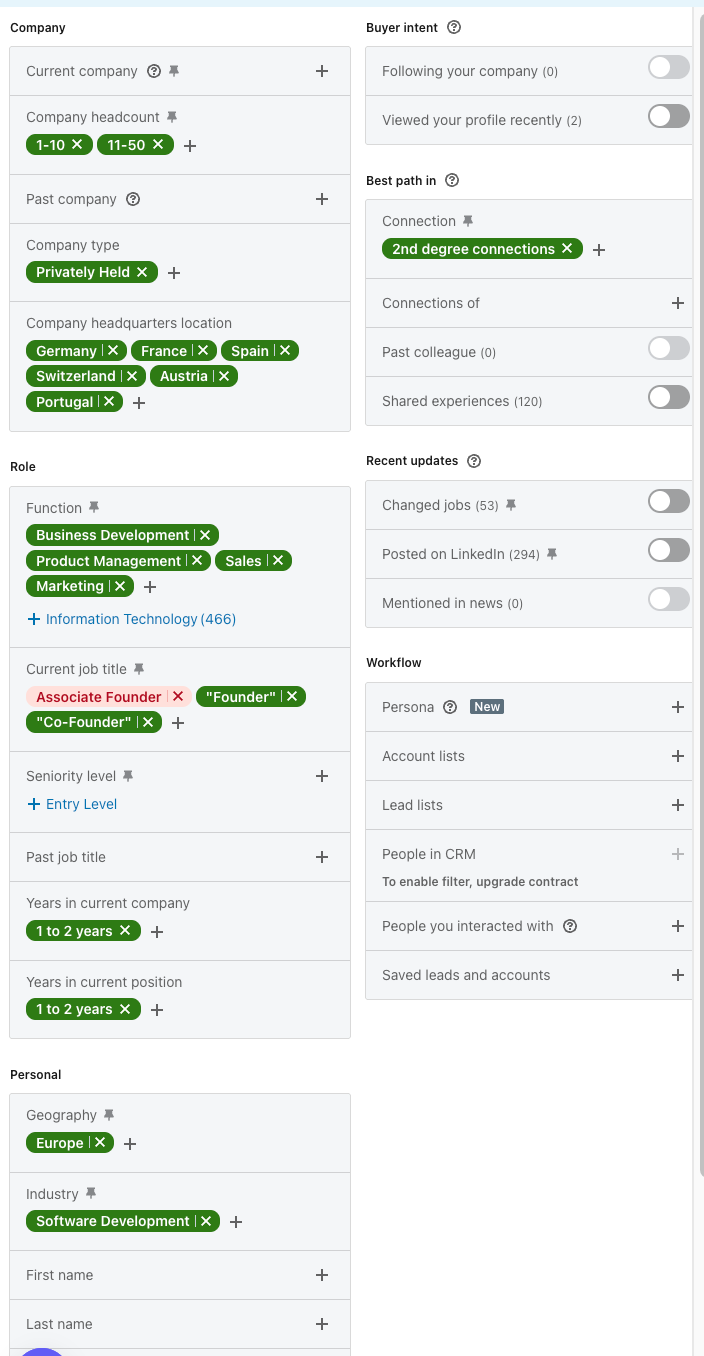
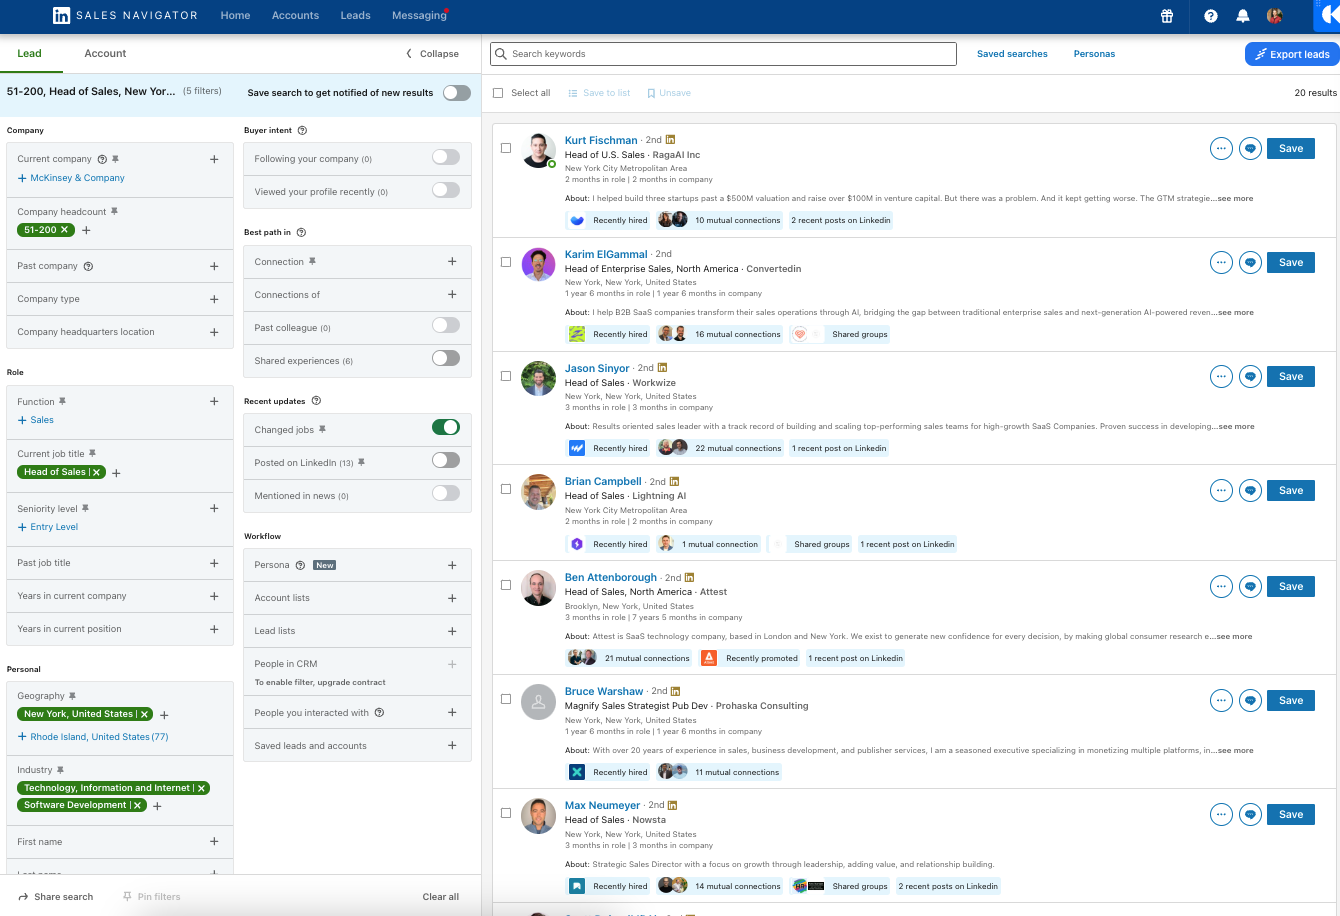
Example of Lead Search
Now we have made a lot of examples of how you can use the different filters.
Here’s a lead search that I would do targeting early-stage SaaS founders in Europe (responsible for the GTM side).
👇This guide might be too long for your email inbox. So read the full guide here 👇
Chapter 2: Saved lead searches
Your lead search is built. Now, make it work for you—automatically.
Saved searches turn Sales Navigator into a 24/7 prospecting assistant.
It constantly finds new leads that match your criteria.
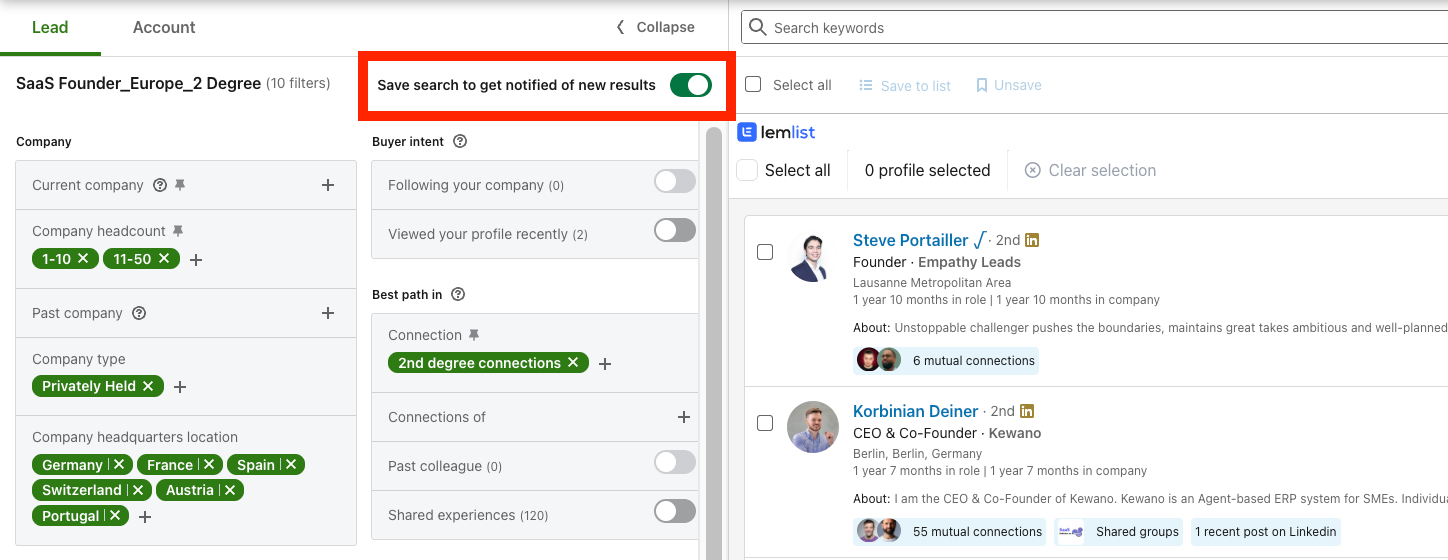
How to save a search?:
1. Click "Save search" at the top left
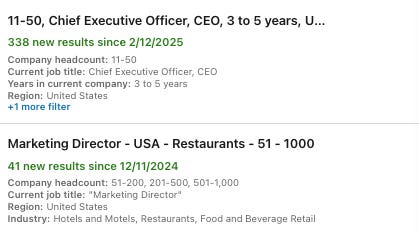
2. Name your search clearly (so you recognize it later)
Good search names include:
Job title (e.g., Head of Sales)
Region (e.g., NYC (USA)
Company size (e.g., Mid-Market)
Industry (e.g. Tech)
Connection Degree
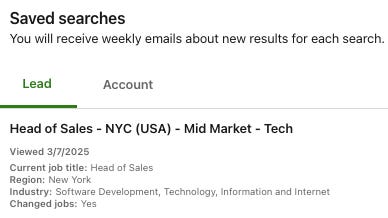
Example: "Head of Sales - NYC (USA) - Mid-Market - Tech"
3. Build a system of saved searches:
Keep your searches fresh -
Saved searches aren’t set-and-forget.
They need regular updates to stay useful.
Monthly Check-up:
Review your saved searches
Check how many results each is returning
Adjust filters if needed
Quarterly Audit:
Which searches bring the best leads?
Are any searches outdated?
Do you need to create new ones?
Chapter 3: Create lead lists - Organize your leads.
Finding great prospects is just the first step. Now, you need a system to keep track of them.
Using Lists can be a good way to keep your contacts organized.
If and how you use them depends on your overall tech stack.
You now have different options:
1) Add contacts from list/searches to your CRM and/or Sales engagement tools (e.g. Lemlist) → We will cover this in chapter 8.
2) Use Lists and Sales Navigator as your personal CRM
How lead lists work:
Each time you find a promising prospect, add them to a list.
Sales Navigator will track their activity for you.
This means you’ll always know:
When they change jobs
When they post updates
When they engage with content
More insights = Better timing for outreach.
How to create a lead list?
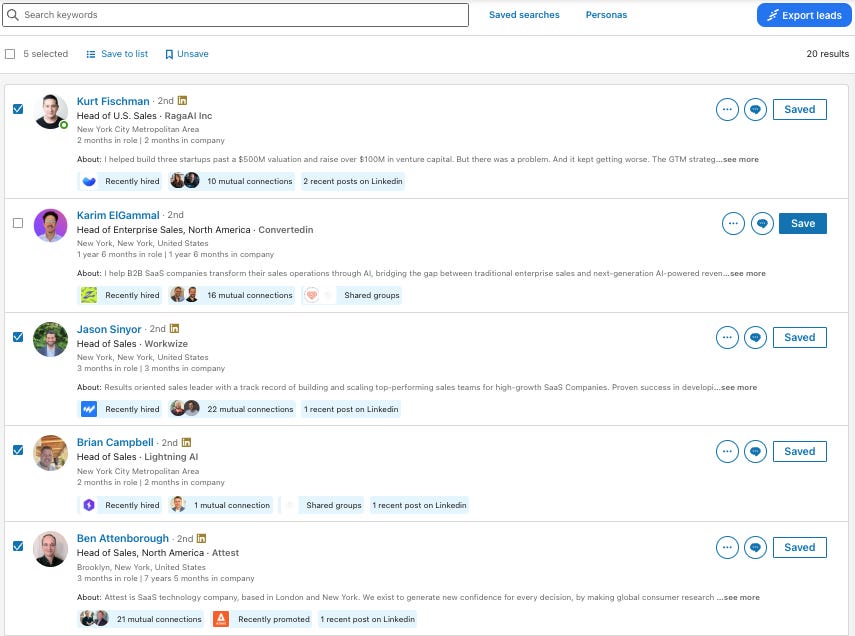
Run a lead search for your ideal prospects
Select promising leads using checkboxes:
And yes, this step is manual. You need to select the profiles that are relevant to you. The better your search, the fewer ‘irrelevant’ people you will find, and the easier it will be to add ICP people to your lists.
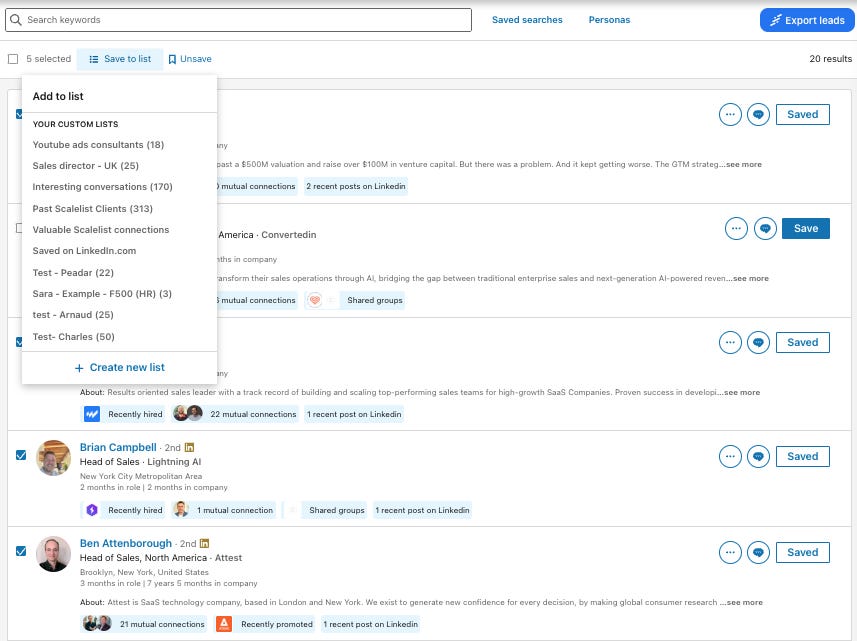
Click "Save to list" at the top. Choose an existing list or create a new list.
Organizing Lists:
How you organize your lists depends on how intensively you’re using LinkedIn as your main sales tool.
Here’s a system that might work for you, too:
Not all leads are equal. Use separate lists to stay focused.
List 1: New Prospects (Fresh Leads)
People you haven’t contacted yet
Recently added from saved searches
Decision-makers just identified
List 2: Active Conversations (Engaged Leads)
Prospects who replied
People showing interest
Ongoing discussions
💡Pro Tip: Review your lead lists weekly. Move leads between lists based on their engagement.
Chapter 4: Monitor sales triggers to engage with your prospects
Timing is Everything.
The difference between cold outreach and a real conversation? Timing.
We won’t discuss sales triggers in detail or how to use them. (Also, a newsletter on signal-based/Allound prospecting will be released in the next few weeks.)
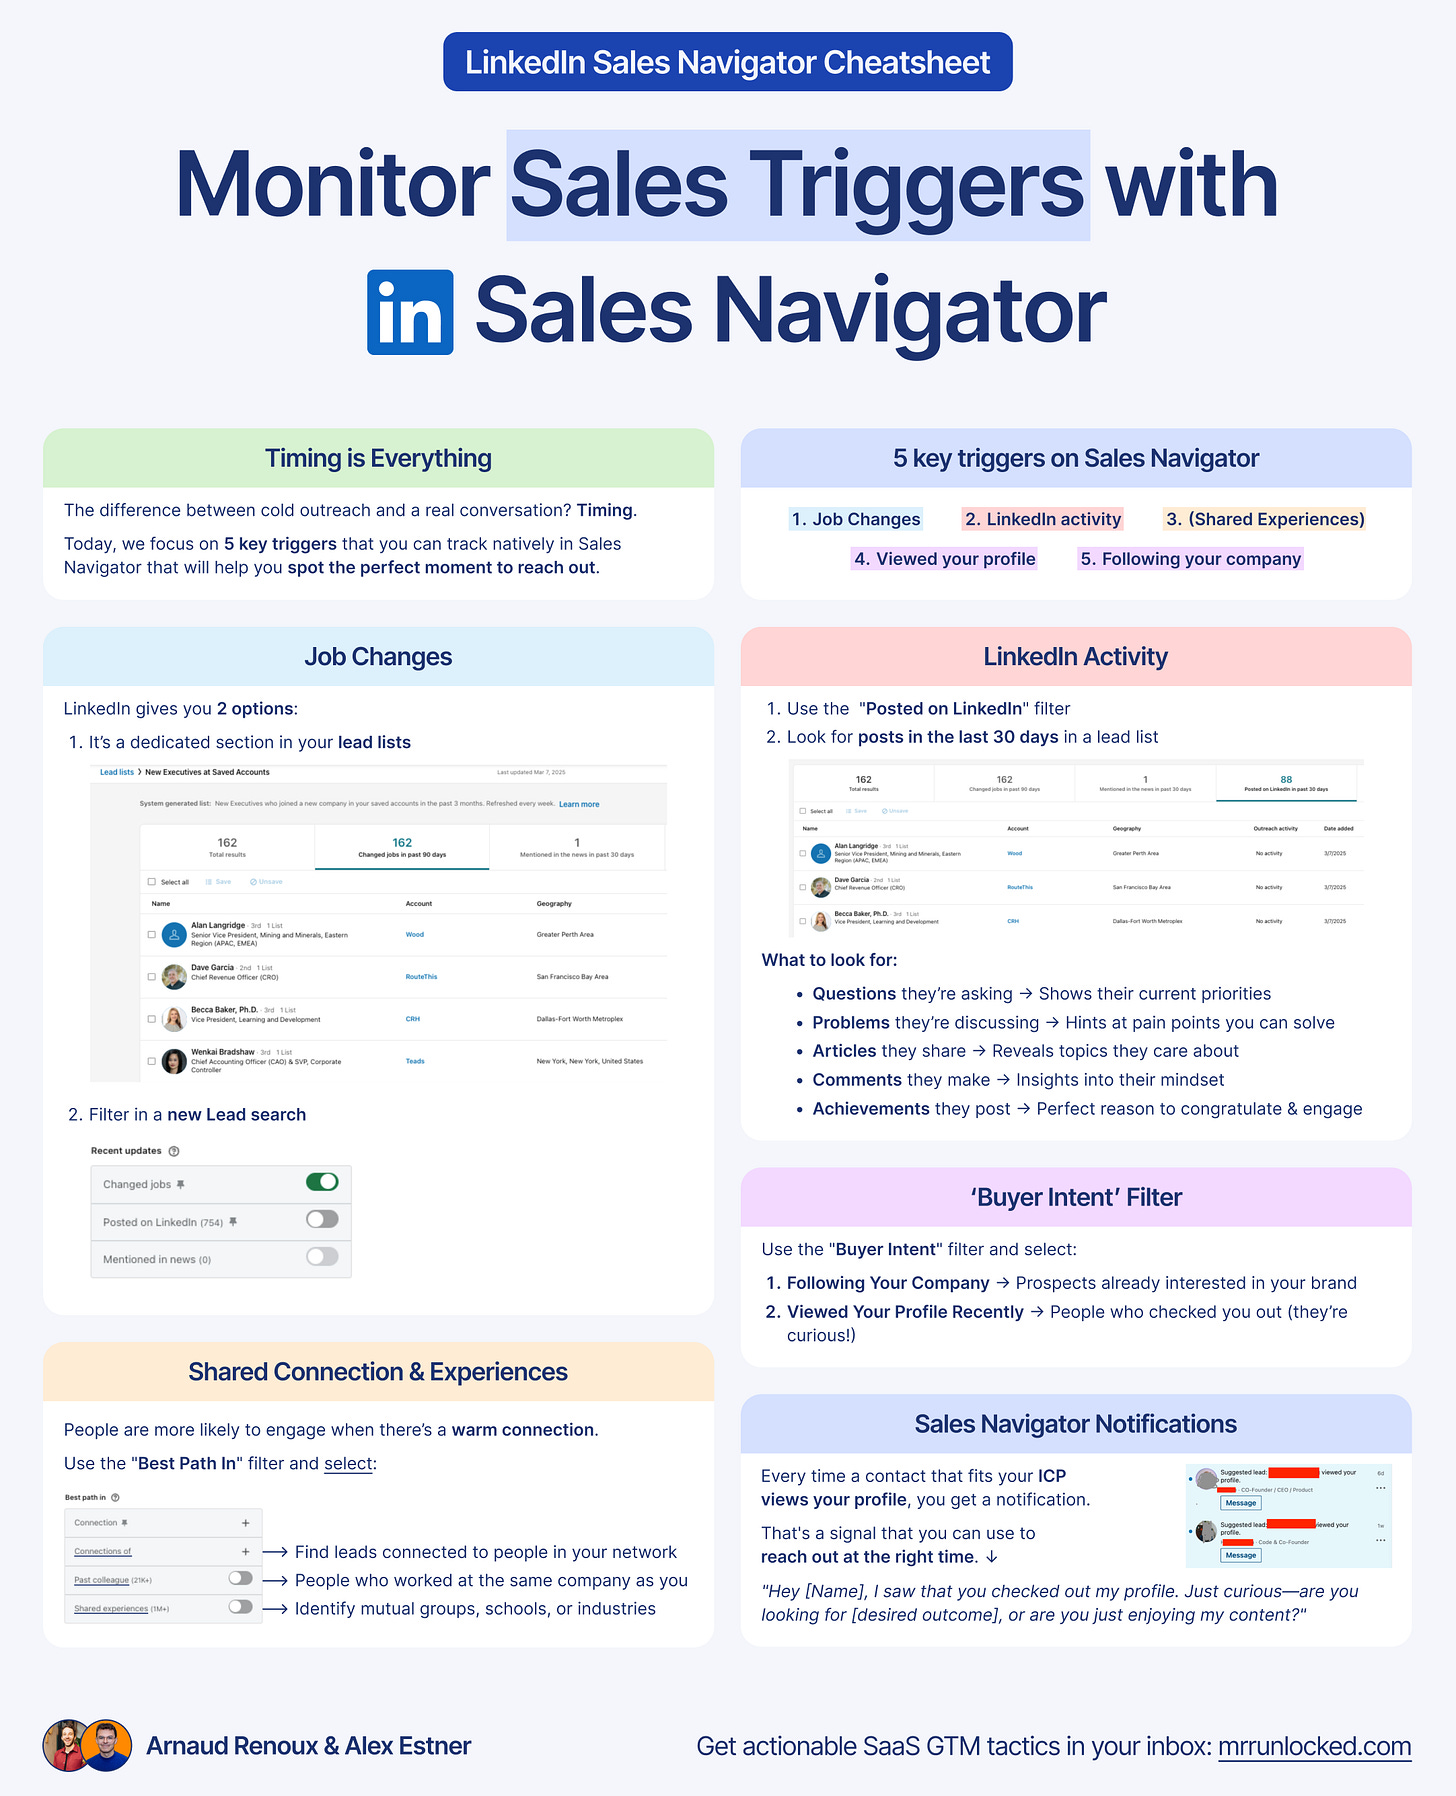
Today, we focus on 5 key triggers that you can track natively in Sales Navigator. These triggers will help you spot the perfect moment to contact someone.
Job Changes
LinkedIn activity
Viewed your profile
Following your company
Shared Connection & Experiences
.
1. Job Changes
A new job is a fresh start. New hires need to prove themselves—and often need new solutions to do it.
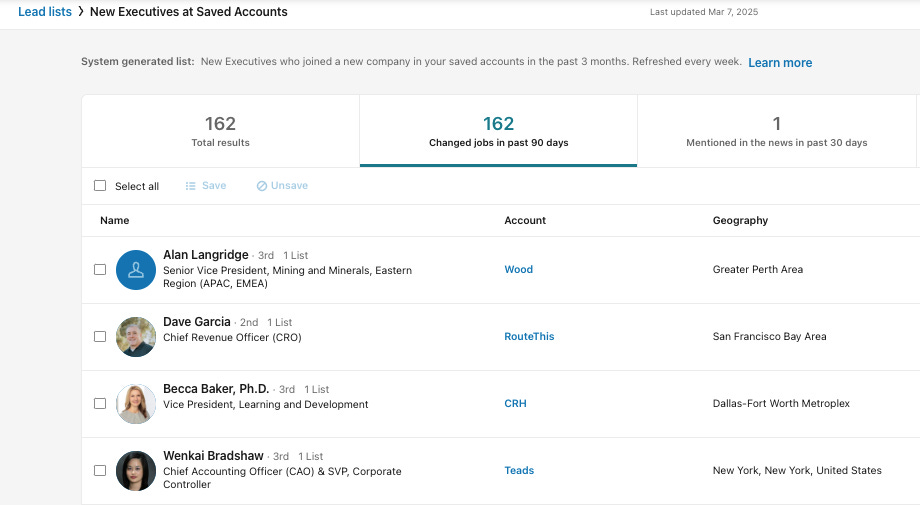
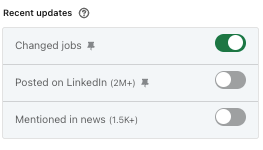
LinkedIn gives you 2 options:
It’s a dedicated section in your lead lists
Filter in a new Lead search (described previously above)
Click their profile and evaluate what’s new.
Types of job changes and why they matter:
Promotions → Bigger responsibilities, fresh budgets, new goals
Company Changes → New environment, urgent challenges, need quick wins
Internal Moves → Knows the company, has influence, understands decision-making
💡Pro Tip: Don’t wait until the end of the 90 days to reach out. Do it as early as possible.
2. Monitoring LinkedIn Activity
Your prospects show you what matters to them.
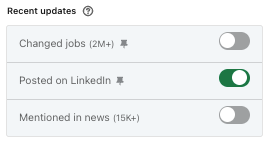
How can you find active prospects (on a lead search + list):
Use the "Posted on LinkedIn" filter
In a lead search:
Look for posts in the last 30 days in a lead list:
Read their content carefully
Identify patterns in their interests
What to look for:
Questions they’re asking → Shows their current priorities
Problems they’re discussing → Hints at pain points you can solve
Articles they share → Reveals topics they care about
Comments they make → Insights into their mindset
Achievements they post → Perfect reason to congratulate & engage
💡Pro Tip: Engage with them before you connect with them. Comment a few times on their posts to get on their radar.
3. Buyer Intent Filter: Spot high-intent prospects:
Some leads already know who you are—these are your easiest conversations.
How to find them:
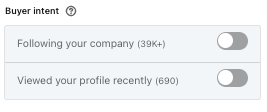
Use the "Buyer Intent" filter and select:
Following Your Company → Prospects already interested in your brand
Viewed Your Profile Recently → People who checked you out (they’re curious!)
💡Pro Tip: Reach out within 24 hours of a profile view—it’s when interest is highest.
4. Use shared connections & experiences to start conversations
People are more likely to engage when there’s a warm connection or clear interest. Sales Navigator helps you find these opportunities.
Leverage shared connections to warm intros:
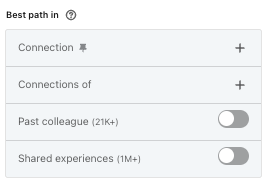
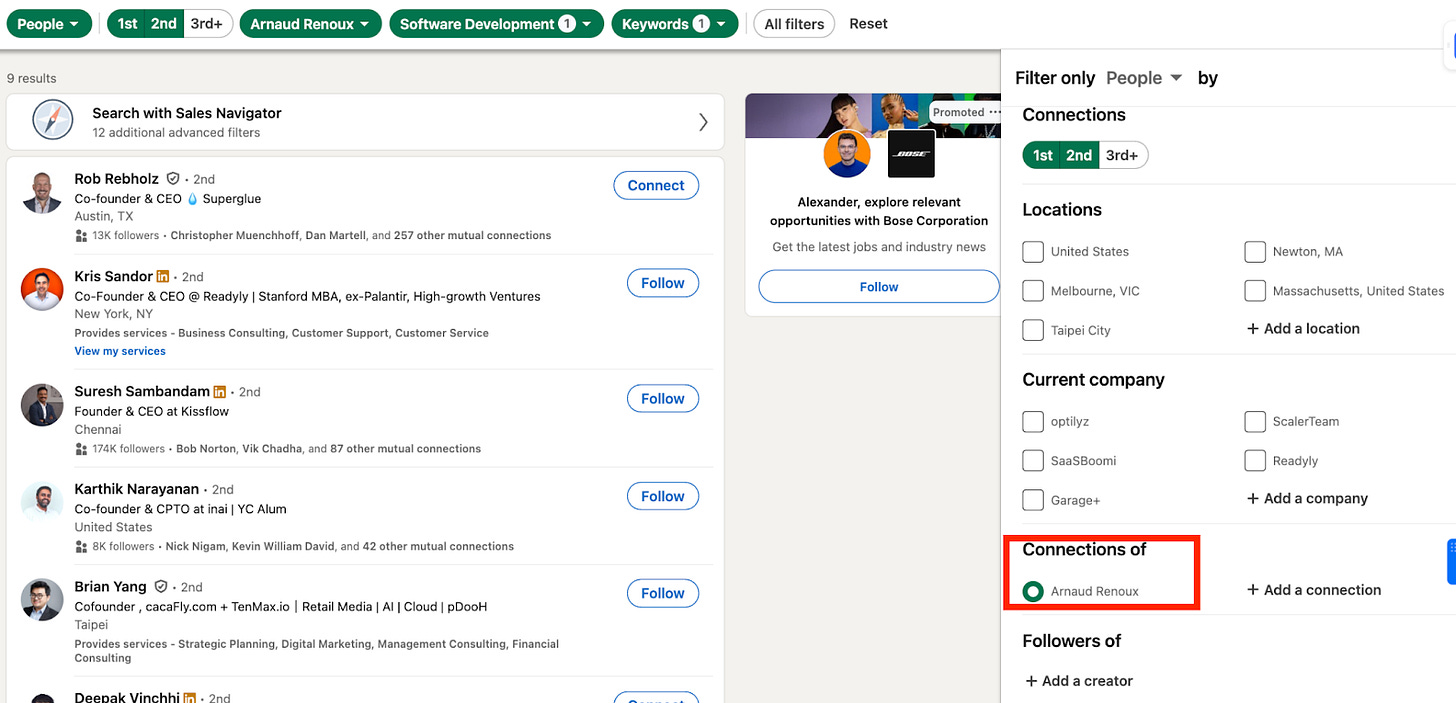
Use the "Best Path In" filter and select:
Connections of → Find leads connected to people in your network
Past Colleagues → Target people who worked at the same company as you
Shared Experiences → Identify mutual groups, schools, or industries
💡Pro Tip: Mention your shared connection in your first message. It builds instant trust.
5. Sales Navigator Notifications
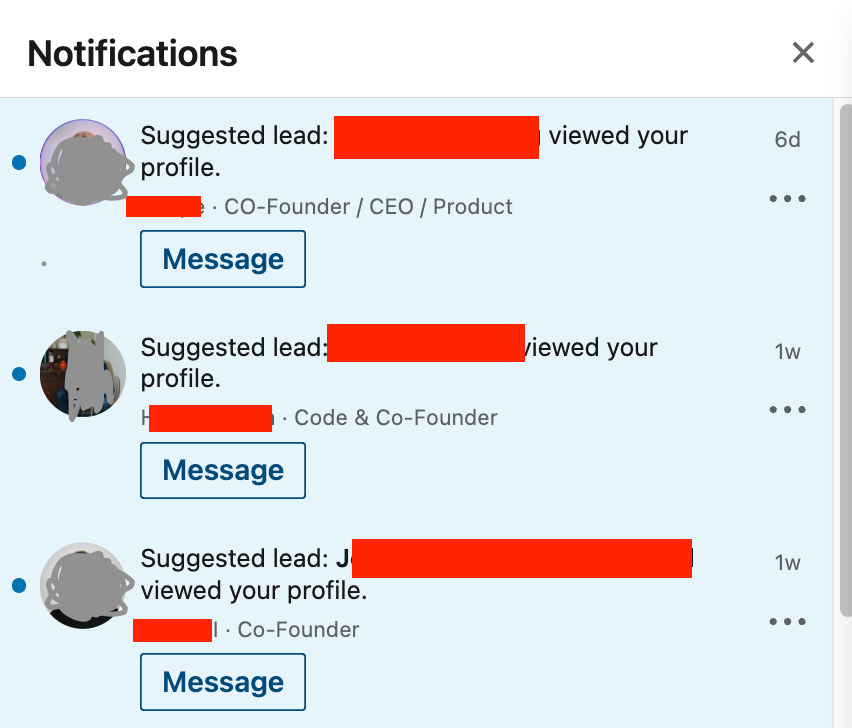
Sales Navigator has notifications, so every time a contact that fits your ICP views your profile, you get a notification. Yes, that's a signal that you can use to reach out at the right time.
Example of a LinkedIn message:
"Hey [Name], saw you checked out my profile—curious what caught your eye?"
"Hey [Name], I saw that you checked out my profile. Just curious—are you looking for [desired outcome], or are you just enjoying my content?"
→ For more, check out how to run campaigns with warm leads on LinkedIn.
Until now, we have focused on ‘individual’ searches.
Now, let’s have a look at ‘company’ searches - aka. ABM-specific chapter.
Chapter 5: Account search (ideal for ABM)
In Chapter 1-4 our approach was to find the relevant people directly. In the next few chapters, we will focus on accounts first and then finding the right people within those accounts.
This approach is great for account-based marketing (ABM) - meaning if you have a specific list of target companies.
So let’s dive into it.
In this approach, instead of looking for decision-makers, you’re searching for:
✅ Companies that match your ICP (see chapter 0) - industry, size, location
and ideally:
✅ Companies with the budget to buy
✅ Businesses in growth mode
Once you lock in the right companies, finding the right people inside them is easy.
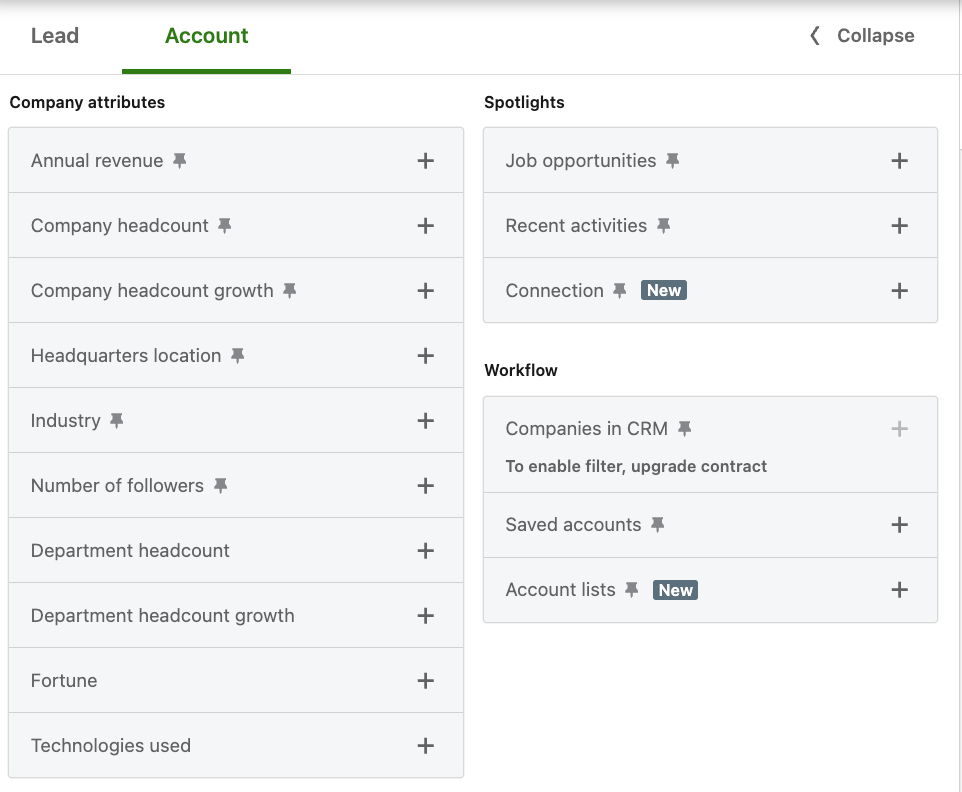
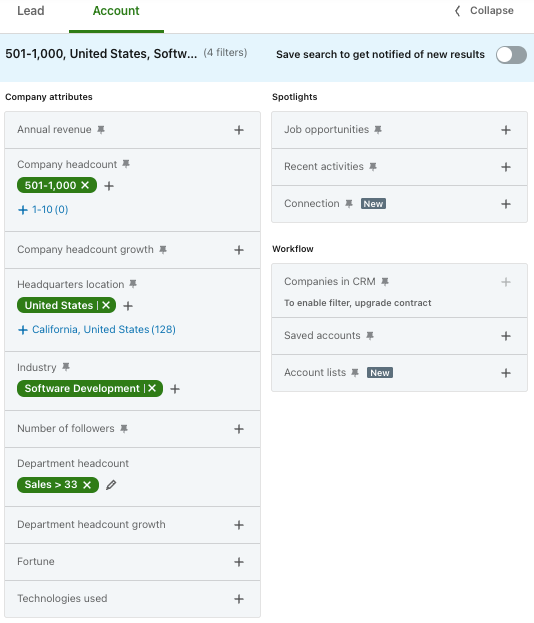
Let’s look at the account filters you can use to come up with your list of target accounts -
1. Annual Revenue
Purpose - Revenue tells you who can afford your solution.
How to use it:
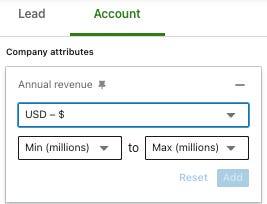
Open Account Filters and find ‘annual revenue’ at the top
Choose a range that fits your pricing
Companies spend 1-5% of their revenue on software and services.
💡 Pro Tip: The bigger the revenue, the longer the sales cycle—adjust your approach.
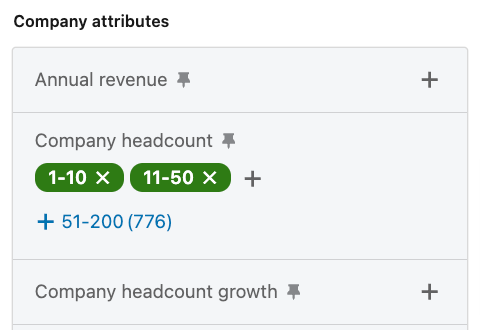
2. Company Headcount
Obvious - you most probably (and hopefully) target a specific segment of the market.
Headcount (together with revenue) is a good criterion to filter.
Example: I work with early-stage SaaS founders from pre-seed to series A - so they should have less than 50 employees (most even under 10).
3. Spot growth signals
Growth = More budget, more urgency, more demand.
Here are the 3 key growth indicators -
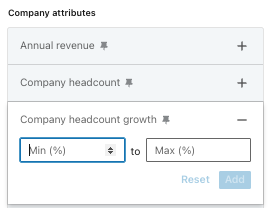
1/ Company headcount growth:
Hiring fast = Expansion = Buying potential
Use "Company headcount growth" filter:
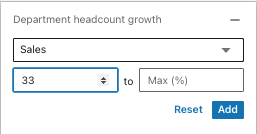
2/ Department headcount growth
More headcount = More tools needed
Select the type of department you’re working with (Sales, IT, Marketing etc…)
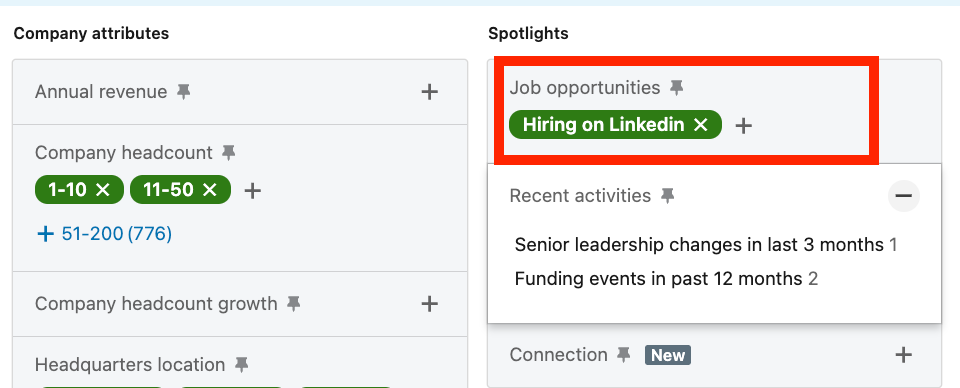
3/ Hiring Trends
Job posts reveal priorities
Click on “Job Opportunities”
Use "Currently Hiring" filter
Understand what companies are expanding
💡Pro Tip: A company hiring in your target department is likely shopping for solutions.
4. Recent activities
We’ve talked about timing. These activities are great trigger events to reach out -e.g. new funding or leadership changes.
5. Geographic Focus
We talked about this already on the lead searches. You can get very specific here:
Choose target regions
Choose countries
Include major business hubs (consider remote work trends also)
Your first search won’t be perfect. So keep refining your searches.
For every search you create:
Step 1: Review Results
Do these companies match your target profile?
Would they benefit from your solution?
Do you see any patterns?
Step 2: Fine-tune criteria
The goal? A high-quality list of companies primed for outreach.
Chapter 6: ABM specific: Create an account list
Same as we did for people, we can do with companies.
Account lists help you track opportunities, manage territories, and stay ahead.
We recommend building multiple lists (aka. segments) for your account lists.
Territory-based lists
In case you already have a few sellers, it’s a great way to separate accounts and manage different regions.
Why does it work:
Helps with regional trends & priorities
Easier to manage time zones & outreach
Aligns with territory quotas & team structures
How to set it up:
Go to “Account”
Apply your account filters
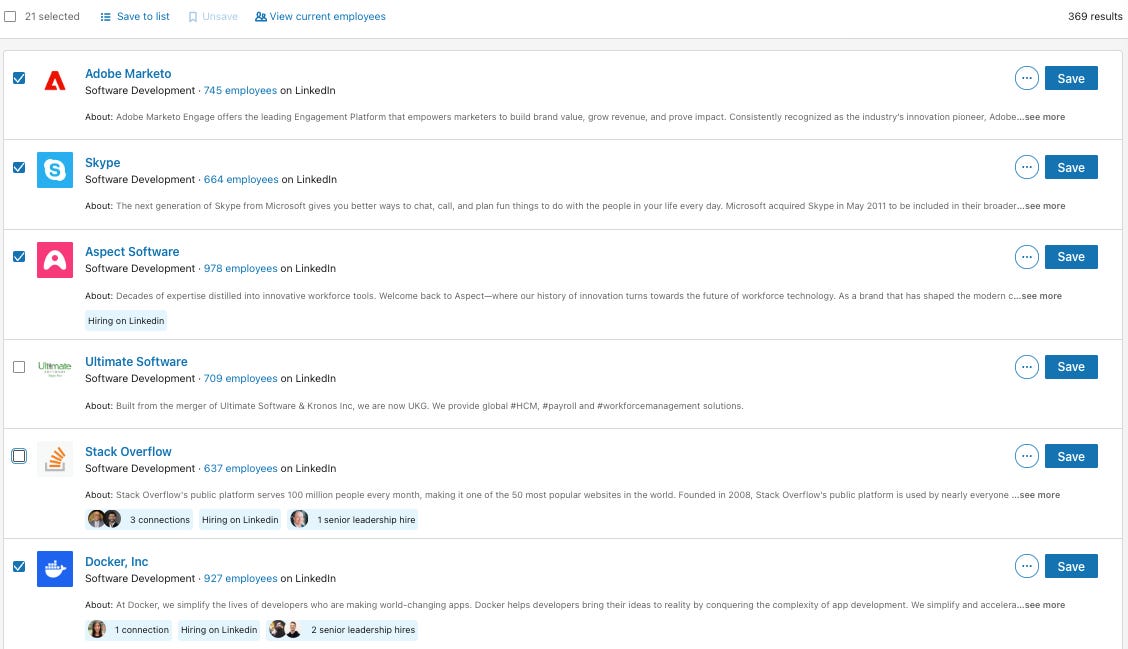
Select the companies you want to keep in your account list & click ‘Save to list”
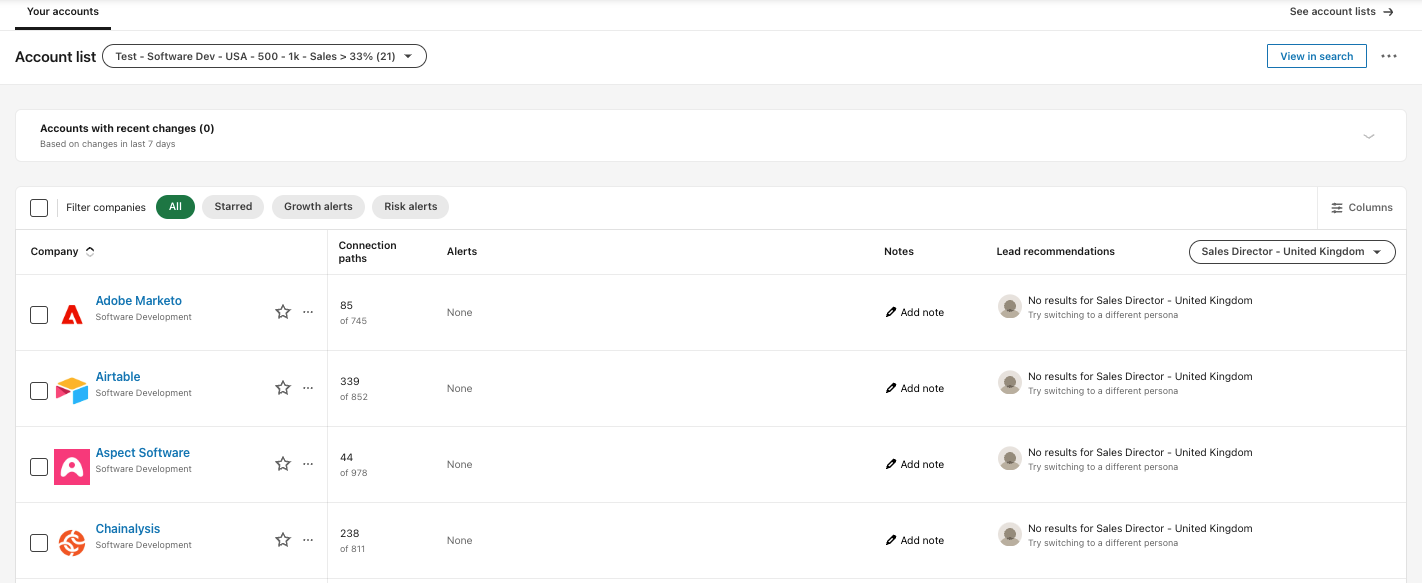
Access your account list in the account list section:
Industry-based lists
Another way to group companies (can work on top of territory).
Different industries = Different pain points
Helps craft better outreach messages
Aligns with industry events & cycles
How to organize it:
Create a list for each major industry you target
Add sub-industries (e.g., Healthcare → MedTech, Hospitals)
Group industries with similar buying behaviors
Strategic Account Lists (Focus on Big Wins)
Some accounts are too valuable to treat like the rest. Here are a few ideas:
✅ Top 20 Target Accounts → Your dream clients
High-value, perfect-fit customers
Companies with long-term potential
Strategic accounts for big deals
✅ Competitive Opportunities → Companies using competitors
Nearing renewal dates
Showing dissatisfaction
Open to upgrades & new solutions
✅ Growth Opportunity Accounts → Fast-scaling businesses
Recently funded companies
Expanding into new markets
Hired new leadership
💡 Pro Tip: Fast-growing companies buy fast—get in early.
Okay, now you have your list of accounts. But we need to engage with people, not accounts.
Chapter 7: ABM specific: Find your decision-makers in targeted companies
So let’s have a look at how you find the right people within those accounts.
Combined Lead & Account Search
LinkedIn enables you to combine both searches. So you can create a lead list based on the existing account list.
Here’s how:
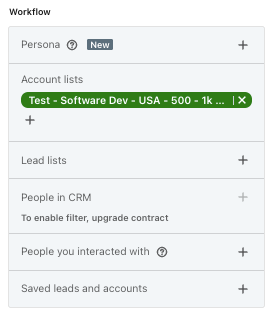
Go to a lead search
Go to Workflow
Select “Account lists”
Pick a previous account list you selected
Get only leads who work for the companies in your selected account list
Understanding company structure
As you know, every B2B sale involves multiple roles.
Knowing who does what helps you target the right people.
Economic Buyer → Controls the budget
Technical Buyer → Evaluates the solution
User Buyer → Uses it daily
Champion → Pushes for your solution internally
Open a company profile in Sales Navigator and click “All Employees”
This tab shows all the people working in this company, including the info about:
Their roles & seniority
Who recently joined or got promoted
Again, if you’re unsure who to target, look for:
New hires (they bring fresh budgets)
Internal promotions (new responsibilities = new needs)
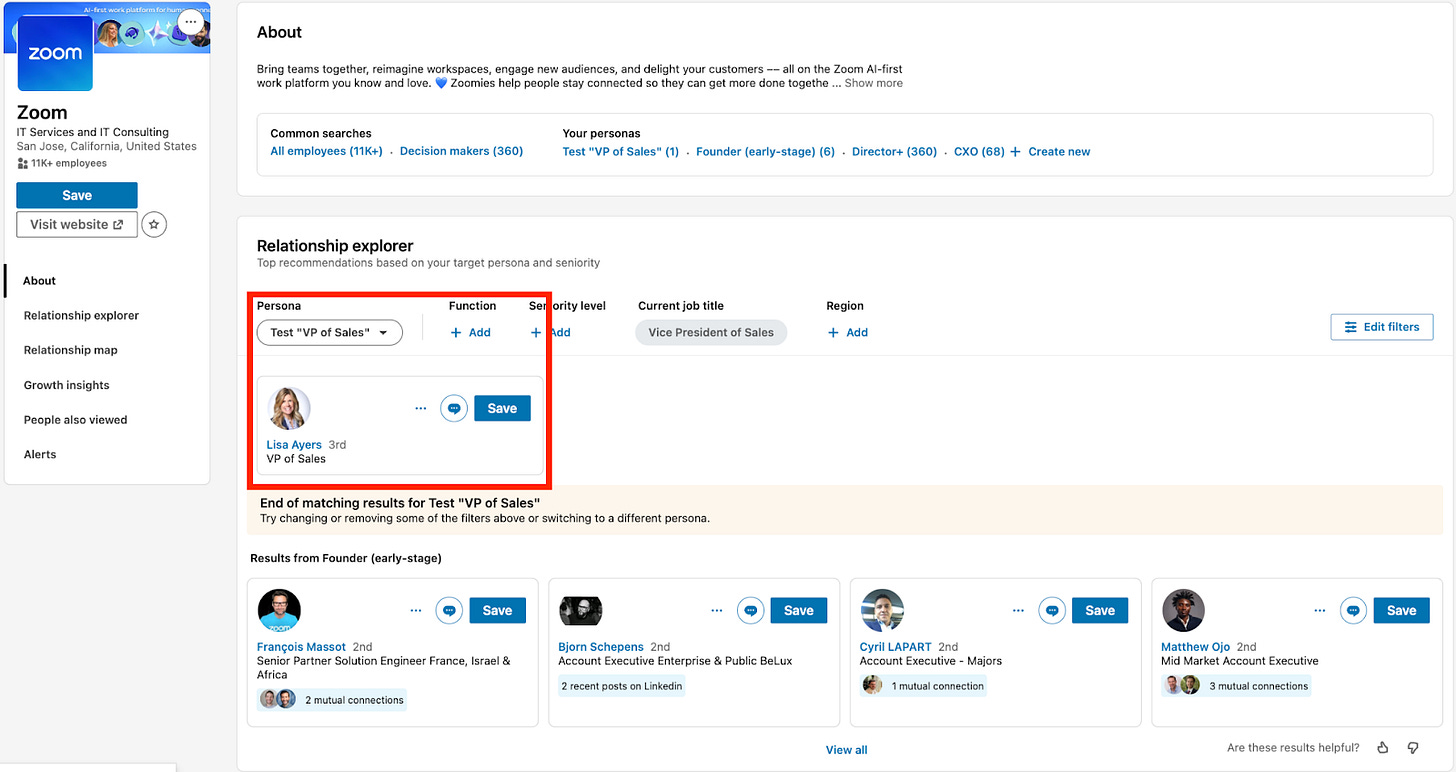
Relationship Explorer
Another way is to analyze your target accounts using the ‘relationship explorer’.
Okay by now, you know how to build your list of contacts and/or companies. Now it’s time to start ‘selling’ and reaching out to them.
Chapter 8: Different ways to reach out
Of course, there is not only one way to reach out to contacts. This guide is not about how the different ways work, but it’s important to mention because it’s part of how you use LinkedIn Sales Navigator.
So let’s give you a quick overview:
1️⃣ Connect (manually) via LinkedIn
That’s the most obvious way. Simply click on ‘connect’ - with or without text.
2️⃣ Run ‘auto’ connect campaigns via LinkedIn
We talked about this in a different episode. You can use tools like Lemlist, Heyreach, or Expandi to send 150 connection requests per week.
3️⃣ Run (multi-channel) outbound campaigns
LinkedIn is not the right tool to run your (automated) multi-channel outbound campaigns. For this, you need to export leads and enrich them (e.g., getting their email address or phone number).
or, of course, sometimes you just want to:
4️⃣ Import them to your CRM
Tools like Surfe make this quite easy.
5️⃣ Export as CSV
Tools like Scalelist (or Evaboot) are helpful here.
Chapter 9: Export Leads from LinkedIn Sales Navigator & get verified emails & phone numbers
Your research is done. Now, it’s time to move your leads into action.
Sales Navigator doesn’t let you export directly. Tools like Scalelist make it easy.
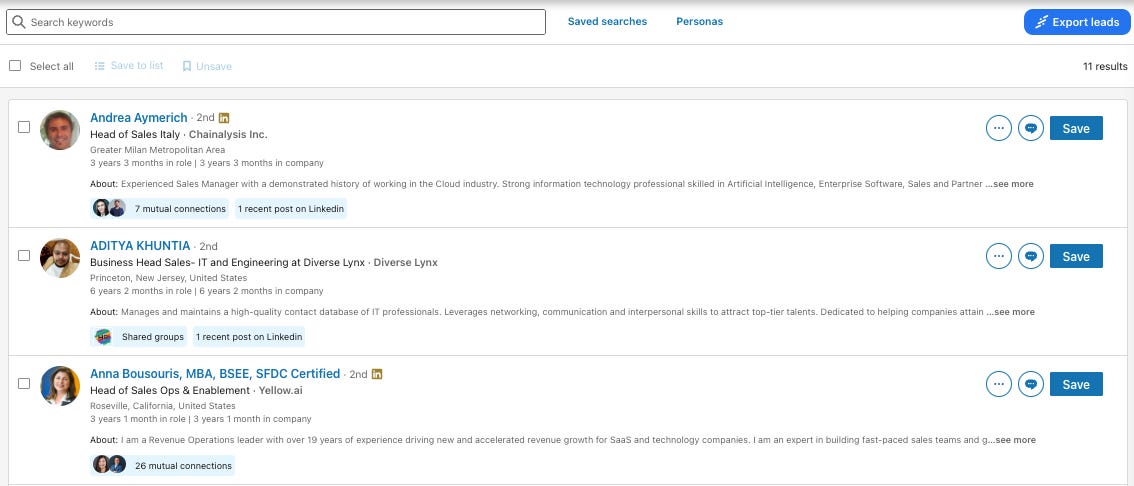
An "Export Leads" button appears in the Sales Navigator:
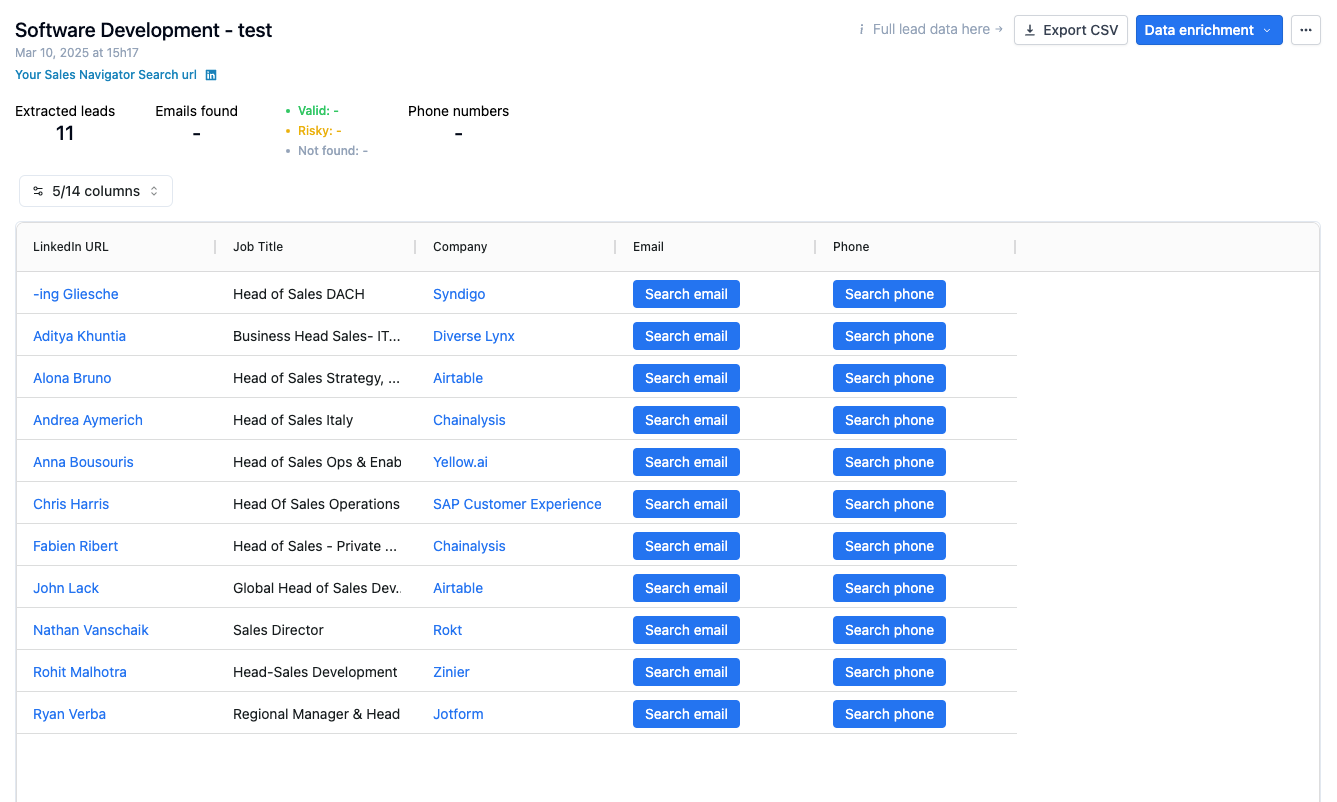
Click on “Export 11 leads” and get your list of leads.
Now it’s time to get their contact details.
Here’s a list of tools you can use: Lemlist (with waterfall enrichment), Findymail, Bettercontact, Evaboot, and, of course, Scalelist.
Accurate emails = Higher reply rates.
But finding and verifying them takes the right process.
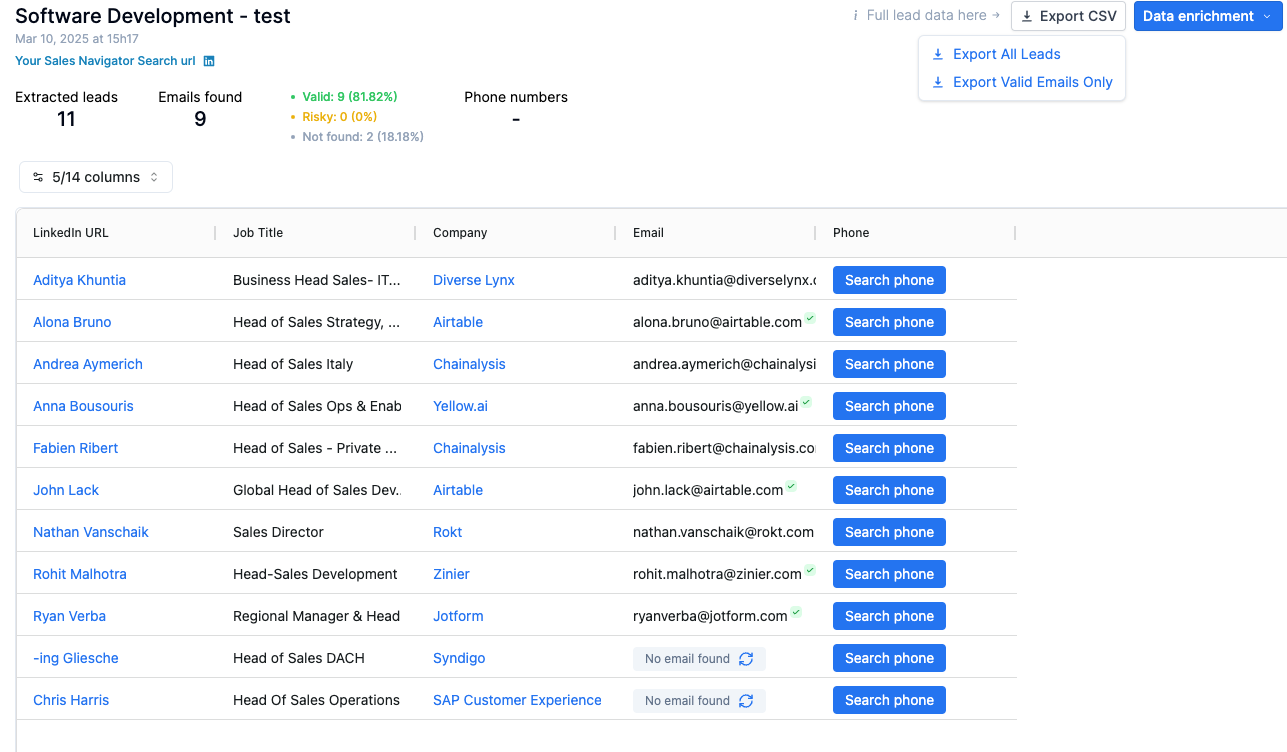
Scalelist automatically finds and verifies professional emails & phone numbers.
Understanding email verification
Not all emails are equal. Here’s how to interpret the results.
- Valid Emails (safe to use)
The mail server is active
The formatting is correct
Mailbox exists
High delivery probability
- Risky Emails (proceed with caution)
Could be catch-all domains
Might be temporary emails
Hard to verify conclusively
20-30% of risky emails are actually valid.
The last step is to export your verified data. In the case of Scalelist, your export will include 14 data points:
1- Sales Nav URL
2- LinkedIn URL
3- First Name
4- Last Name
5- Title
6- Company Name
7- Company Size
8- Industry
9- Location
10- Premium Account Status
11- Company Website
12- Email (if found)
13- Verification Status (Valid, Risky, etc.)
14- Phone Number (if available)
Bonus Section - 3 Referral Playbooks using LinkedIn
We know this guide is already quite long. But we want to share with you 3 awesome LinkedIn playbooks.
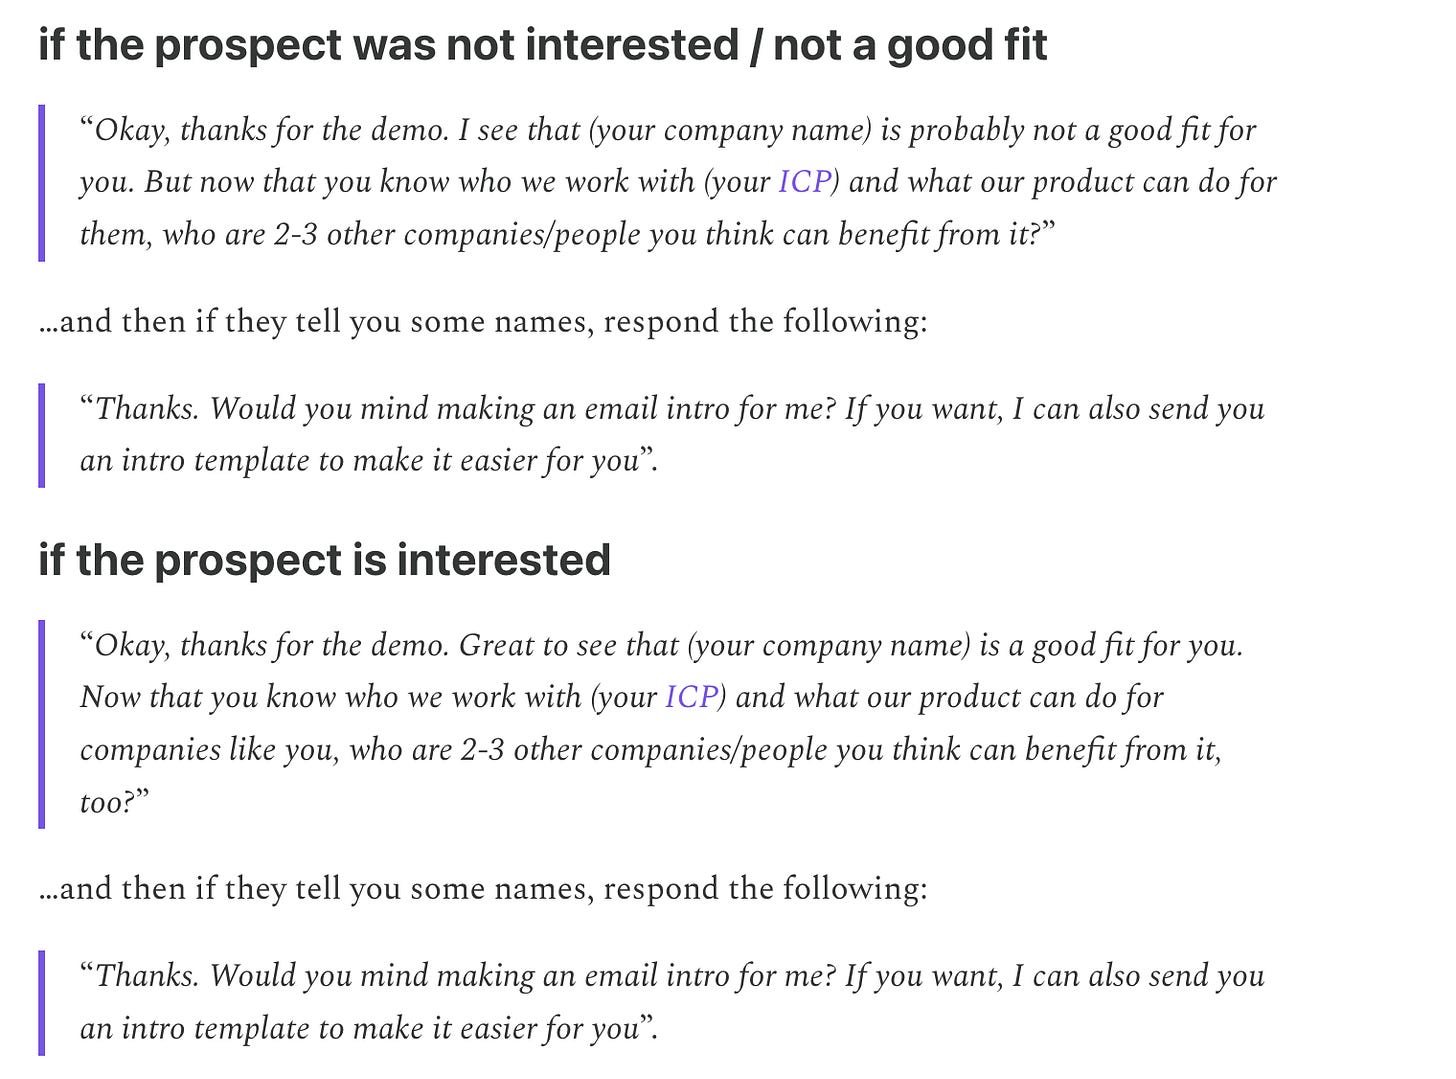
Playbook 1: Getting referrals/intros from your sales conversations
In a previous episode, we talked about how to do proper referral sales. You can use every touchpoint with a prospect/customer to get warm intros.
It depends on how you ask for it.
We recommend to following 2 steps:
Step 1: Ask an open question: “Who do you think could benefit from our product?”
Step 2: In case they don’t know anyone, be prepared and say “I had a quick look at your LinkedIn network before our call and I saw that you’re connected to X, Y, Z who I believe would benefit a lot from our product - How is your connection with them?”
So, that’s where LinkedIn comes in. Prepare for your calls and scan their network for ICP-fits.
Playbook 2: Getting referrals/intros from your network
You tap into the network of your closed group (e.g. investors, employees, partners, friends) and scan their connections for ICPs. Then you will create a shortlist of people you want to get connected to and share the list with your closed group and ask them for introductions.
Playbook 3: Getting referrals/intros from your existing customers
Same play as above. You search for relevant connections of your customers, and once you find a shortlist of relevant people, you can ask them for an intro.
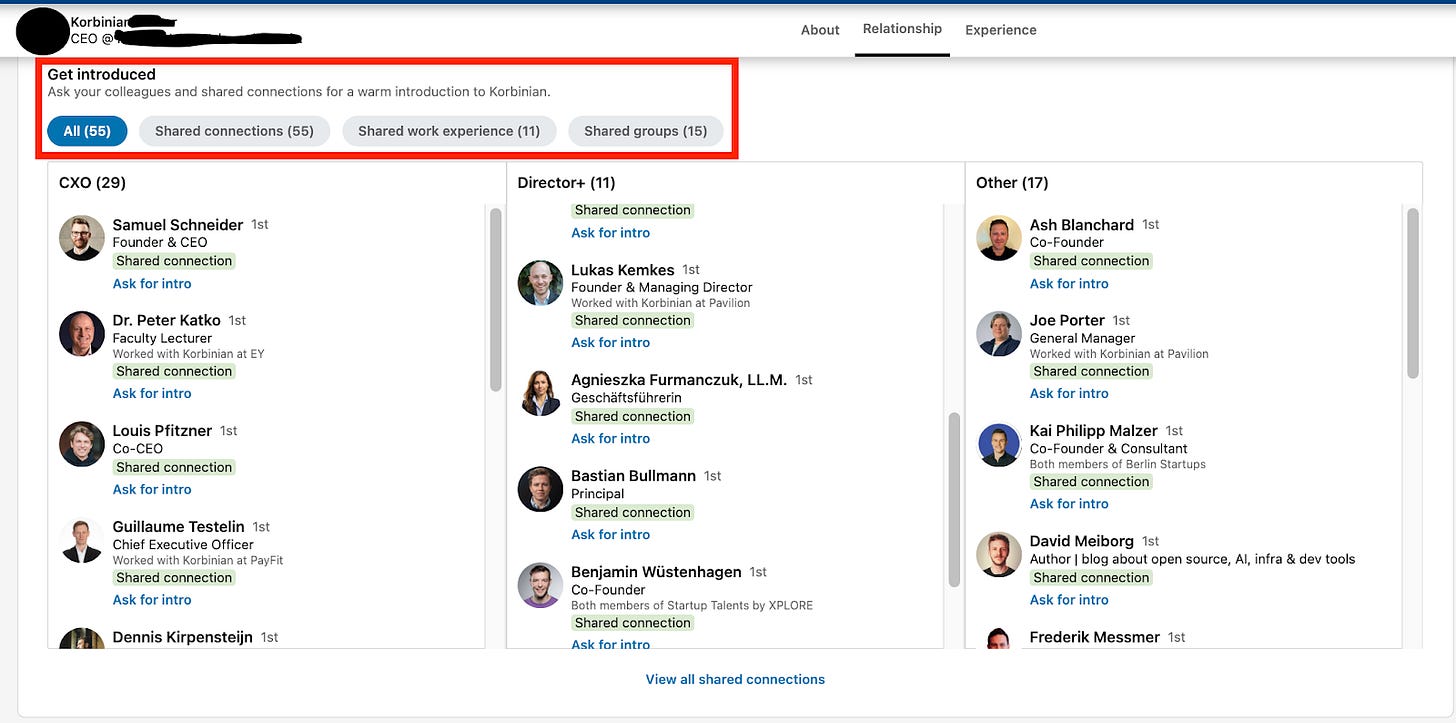
P.S. This works also the other way around. This means that if you’re on a profile of a person you’re NOT connected with, Sales Navigator gives you a list of people who could make an intro for you.
Bonus Materials
Now you know how to use LinkedIn Sales Navigator, but here are some helpful additional resources:
Happy growth 🚀
3 ways I can help you grow your SaaS to €1 million ARR 🚀
Build your GTM strategy with my free SaaS GTM Strategy Workbook (helped 4900+ SaaS leaders)
Get access to 100+ actionable SaaS growth tactics (helped 250+ SaaS leaders) - 100% positive ROI guarantee.
Work 1-on-1 with me - GTM Advisory for early-stage SaaS founders on their way to €1 million ARR (1 free spot - limited to 8 founders).













Happy we wrote this together :)